Integrate ironSource Ads network interstitial with multiple instances for Unity
Make sure you have correctly integrated the ironSource Unity Plugin. Integration is outlined here.
Step 1. Implement the Interstitial Events
The ironSource Unity Plugin fires several events to inform you of ad availability. Under IronSource/Assets/Prefabs, you’ll find the IronSourceEventsPrefab. Add it to your project to receive these events.
Add the following code to register to the events:
void OnEnable () {
	IronSourceEvents.onInterstitialAdReadyDemandOnlyEvent += InterstitialAdReadyDemandOnlyEvent;
	IronSourceEvents.onInterstitialAdLoadFailedDemandOnlyEvent += InterstitialAdLoadFailedDemandOnlyEvent;
	IronSourceEvents.onInterstitialAdShowSucceededDemandOnlyEvent += InterstitialAdShowSucceededDemandOnlyEvent;
	IronSourceEvents.onInterstitialAdShowFailedDemandOnlyEvent += InterstitialAdShowFailedDemandOnlyEvent;
	IronSourceEvents.onInterstitialAdClickedDemandOnlyEvent += InterstitialAdClickedDemandOnlyEvent;
	IronSourceEvents.onInterstitialAdOpenedDemandOnlyEvent += InterstitialAdOpenedDemandOnlyEvent;
	IronSourceEvents.onInterstitialAdClosedDemandOnlyEvent += InterstitialAdClosedDemandOnlyEvent;
}
The Plugin will notify the Listener of all possible events listed below:
void InterstitialAdReadyDemandOnlyEvent (string instanceId)
    {
    }

    void InterstitialAdLoadFailedDemandOnlyEvent (string instanceId, IronSourceError error)
    {
    }

    void InterstitialAdShowSucceededDemandOnlyEvent (string instanceId)
    {
    }

    void InterstitialAdShowFailedDemandOnlyEvent (string instanceId, IronSourceError error)
    {
    }

    void InterstitialAdClickedDemandOnlyEvent (string instanceId)
    {
    }

    void InterstitialAdOpenedDemandOnlyEvent (string instanceId)
    {
    }
    void InterstitialAdClosedDemandOnlyEvent (string instanceId)
    {
    }
    void InterstitialAdRewardedDemandOnlyEvent (string instanceId)
    {
  }
Step 2. Load Interstitial Ad
We recommend requesting an Interstitial Ad a short while before you plan on showing it to your users as the loading process can take time. To request an interstitial ad, call the following method:
IronSource.Agent.loadISDemandOnlyInterstitial (INTERSTITIAL_INSTANCE_ID);
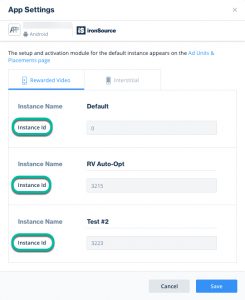
Instance ID
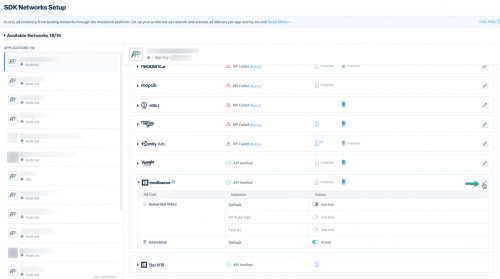
Once you save the defined instances for the ironSource Ads network, we will generate an Instance ID for you. You can retrieve this ID by navigating to the App Settings window:
Here you’ll see the Instance ID:
Step 3. Check Ad Availability
After you’ve called the loadInterstitial in Step 2, you will be notified when the ad is loaded and ready to be shown to your user. The InterstitialAdReadyEvent will inform you about ad availability.
void InterstitialAdReadyDemandOnlyEvent (string instanceId){}
In addition, you have the possibility to request the ad availability directly by calling the following function:
IronSource.Agent.isISDemandOnlyInterstitialReady (INTERSTITIAL_INSTANCE_ID);
Step 4. Show Interstitial Ad
Once you receive the InterstitialAdReady callback, you are ready to show an Interstitial Ad to your users. Invoke the following method to serve an Interstitial ad to your users:
IronSource.Agent.showISDemandOnlyInterstitial (INTERSTITIAL_INSTANCE_ID);
With ironSource’s Ad Placements, you can customize and optimize the Interstitial experience. This tool enables you to present Interstitial ads to your users in different places, i.e. app launch, between levels, etc. You can use the below function to define the exact placement to show an ad from. Navigate to the Ad Placement document for more details.
IronSource.Agent.showISDemandOnlyInterstitial (INTERSTITIAL_INSTANCE_ID, PLACEMENT_NAME);
In addition to ironSource’s Ad Placements, you can now configure capping and pacing settings for selected placements. Capping and pacing improve the user experience in your app by limiting the number of ads served within a defined timeframe. Read more about capping and pacing here.
We recommend calling the following to verify if a placement is capped before you serve the Interstitial to your user:
IronSource.Agent.isInterstitialPlacementCapped(placementName)
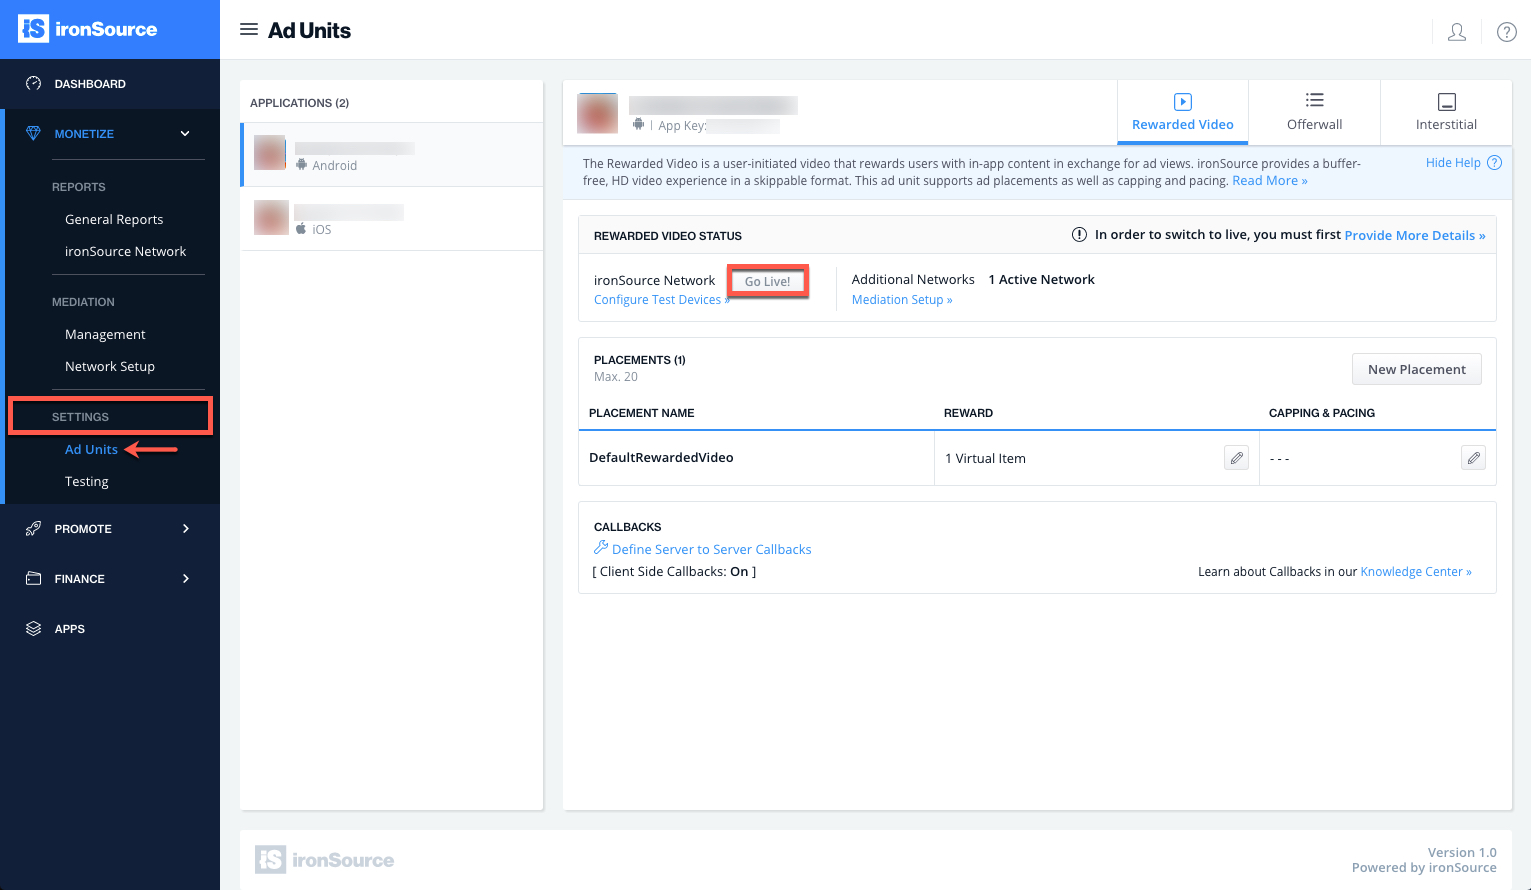
If this is a new integration for your application, your app will by default be in ‘Test Mode‘ on your ironSource dashboard. While your app is in Test Mode, the ironSource SDK will print more logs to the console in order to provide greater visibility into the SDK processes. To test your ad inventory, set up your Test Devices. Until you turn on live ad inventory, you will receive test campaigns that don’t generate revenue. Make sure to select Go Live! on the Ad Units page when your app is ready for live ad inventory.

Done!
You can now deliver ironSource Interstitial Ads through the Interstitial Mediation platform!