Integrating ironSource Network with Multiple Instances for iOS SDK
Getting Started
Step 1. Add the SDK to Your Project
Follow step 1 as described here.
Step 2. Import Files
Import the necessary files:
#import "IronSource/IronSource.h"
For Swift, find detailed instructions and download the header file here.
Step 3. Verify Your Integration
The ironSource SDK provides an easy way to verify that your SDK integration was completed successfully. To verify your ironSource SDK integration as well as any additional ad networks you have implemented, simply add this method to your project:
[ISIntegrationHelper validateIntegration];
For more details on the ironSource Integration Verification tool navigate to this article.
Init ironSource SDK
If you plan to use server-to-server callbacks to reward your users, make sure to set the UserID before you init the SDK.
Step 1: Init the SDK
Init the ironSource SDK, by sending the publisher’s app-key as a parameter. Note that the ad-unit can be used as additional parameter if required.
[IronSource initISDemandOnly:IRONSOURCE_APP_KEY];
Step 2: set Mediation indication
Add the your mediation indication as part of the ironSource Adapter. We recommend using the format: MediationName + Adapter Version + “SDK”+ Mediation SDK version.
Your MediationName should be hard-coded, however Adapter Version and Mediation SDK version should reflect the current integration.
[IronSource setMediationType:[MediationType_String]];Integrate Rewarded Videos
As of ironSource SDK Release 7.1.1 the APIs initISDemandOnly and loadISDemandOnlyRewardedVideo were deprecated due to changes in the API’s parameters.
These APIs should be replaced with APIs with the same names and updated signatures.
The ironSource Rewarded Video ad unit offers an engaging ad experience that rewards your users with valuable virtual content in exchange for a completed view. This user-initiated ad unit is great for gaming apps, and enhances every app experience!
Unlock and leverage multiple Rewarded Video instances of the ironSource network with the Demand Only API to optimize your ad delivery!
Step 1. Set the Rewarded Video Delegate
The ironSource SDK fires several delegate methods to inform you of ad availability and completions so you’ll know when to reward your users. To receive these methods, register to the Rewarded Video delegate:
[IronSource setISDemandOnlyRewardedVideoDelegate:YOUR_REWARDED_VIDEO_DELEGATE];
The SDK will notify your delegate of all possible methods listed below:
#pragma mark - ISDemandOnlyRewardedVideoDelegate
//Called after a rewarded video has been requested and load succeed.
- (void)rewardedVideoDidLoad:(NSString *)instanceId{
}
//Called after a rewarded video has attempted to load but failed.
//@param error The reason for the error
- (void)rewardedVideoDidFailToLoadWithError:(NSError *)error instanceId:(NSString* )instanceId{
}
//Called after a rewarded video has been viewed completely and the user is //eligible for reward.
- (void)rewardedVideoAdRewarded:(NSString *)instanceId{
}
//Called after a rewarded video has attempted to show but failed.
//@param error The reason for the error
- (void)rewardedVideoDidFailToShowWithError:(NSError *)error:(NSString *)instanceId {
}
//Called after a rewarded video has been opened.
- (void)rewardedVideoDidOpen:(NSString *)instanceId {
}
//Called after a rewarded video has been dismissed.
- (void)rewardedVideoDidClose:(NSString *)instanceId {
}
//Invoked when the end user clicked on the RewardedVideo ad
- (void)didClickRewardedVideo:(ISPlacementInfo *)placementInfo:(NSString *)instanceId {
}
Error Codes
ironSource provides an error code mechanism to help you understand errors you may run into during integration or live production. See the complete guide here.
Step 2. Show a Video Ad to Your Users
We recommend requesting a Rewarded Video ad a short while before you plan on showing it to your users as the loading process can take time.
Load Rewarded Video
To request a Rewarded Video ad, call the following method:
[IronSource loadISDemandOnlyRewardedVideo:YOUR_INSTANCE_ID];
Step 3. Check Ad Availability
By correctly implementing the ISDemandOnlyRewardedVideoListener and its functions, you can receive the availability status through the onRewardedVideoLoadSuccess callback.
- (void)rewardedVideoDidLoad:(NSString *)instanceId{
}
In addition, you can also ask for the ad availability directly by calling the following function:
[IronSource hasISDemandOnlyRewardedVideo:YOUR_INSTANCE_ID];
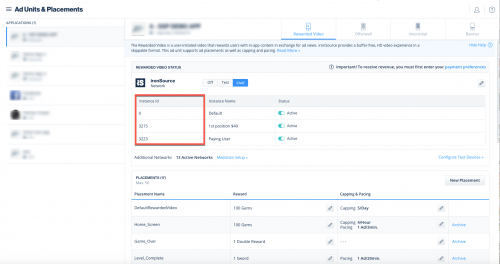
Instance ID
Once you save the defined instances for the ironSource network, we will generate an Instance ID for you. You can retrieve this ID from the instance table within the Ad Units & Placements page:
Serve Video Ad
Once there is an available video, you are ready to serve this video ad to your user. This is the ideal moment to insert a trigger to encourage your users to watch the video ad. Call the following method to show a video ad to your users:
[IronSource showISDemandOnlyRewardedVideo:YOUR_VIEW_CONTROLLER instanceId:YOUR_INSTANCE_ID];
Dynamic UserID
The Dynamic UserID is a parameter to verify AdRewarded transactions and can be changed throughout the session. To receive this parameter through the server to server callbacks, it must be set before calling showRewardedVideo. You will receive adynamicUserId parameter in the callback URL with the reward details.
[IronSource setDynamicUserId:@"DynamicUserId"];
Step 4. Reward the User
Make sure you’ve set the userID before you initialize the ironSource SDK in order to successfully reward your users.
The ironSource SDK will fire the onRewardedVideoAdRewarded callbacks each time the user successfully completes a video. The ISDemandOnlyRewardedVideoListener will be in place to receive this event so you can reward the user successfully.
The rewardedVideoAdRewarded and rewardedVideoDidClose delegate methods are asynchronous. Make sure to set up your listener to grant rewards even in cases where rewardedVideoAdRewarded is fired after the rewardedVideoDidClose event.
The placement object contains both the reward name & reward amount of the placement as defined in your ironSource Admin:
- The default setting in your ironSource account is to notify you of user completions/rewards via the didReceiveReward callback within the client of your app. Additionally, if you would also like to receive notifications to your back-end server, you can turn on server-to-server callbacks.
- If you turn on server-to-server callbacks, remember not to reward the user more than once for the same completion. We will be firing both the client-side callback and the server-to-server callback, so you will get two notifications for each completion. To utilize server-to-server callbacks, see here.
Done!
You are now all set to deliver Rewarded Video in your application.
Integrate Interstitials
As of ironSource SDK Release 7.1.1 the APIs initISDemandOnly and loadISDemandOnlyInterstitial were deprecated due to changes in the API’s parameters.
These APIs should be replaced with APIs with the same names and updated signatures.
The ironSource Interstitial is a full-screen ad unit, usually served at natural transition points during the app lifecycle. We support both static and video interstitials.
Unlock and leverage multiple Interstitial instances of the ironSource network with the Demand Only API to optimize your ad delivery!
Step 1. Implement the Delegate
The ironSource SDK fires several events to inform you of Interstitial Activity. To receive these events, register to the Interstitial delegate:
[IronSource setISDemandOnlyInterstitialDelegate:yourInterstitialDelegate];
The SDK will notify your delegate of all possible events listed below:
#pragma mark - ISDemandOnlyInterstitialDelegate
//Invoked when Interstitial Ad is ready to be shown after the load function was called.
- (void)interstitialDidLoad:(NSString *)instanceId {
}
//Called if showing the Interstitial for the user has failed.
//You can learn about the reason by examining the ‘error’ value
- (void)interstitialDidFailToShowWithError:(NSError *)error instanceId:(NSString *)instanceId {
}
//Called each time the end user has clicked on the Interstitial ad.
- (void)didClickInterstitial:(NSString *)instanceId {
}
//Called each time the Interstitial window is about to close
- (void)interstitialDidClose:(NSString *)instanceId {
}
//Called each time the Interstitial window is about to open
- (void)interstitialDidOpen:(NSString *)instanceId {
}
//Invoked when there is no Interstitial Ad available after calling the load function.
//@param error - will contain the failure code and description.
- (void)interstitialDidFailToLoadWithError:(NSError *)error instanceId:(NSString *)instanceId {
}
- The interstitialDidOpen event conveys that the ad format has taken over the app screen and been displayed but does not indicate that an ad has been successfully served to your end-user.
- Do not assume the callbacks are always running on the main thread. Any UI interaction or updates resulting from ironSource callbacks need to be passed to the main thread before executing.
Step 2. Load Interstitial Ad
Load the Interstitial
To request an interstitial ad, call the following method:
[IronSource loadISDemandOnlyInterstitial:YOUR_INSTANCE_ID];
- Once you set up an instance on the ironSource platform, you will receive an Instance ID and can easily retrieve it.
- The load method will request an Interstitial ad for the specific instance associated with the Instance ID.
- If you’d like to serve several Interstitial Ads in your application, you must repeat this step after you’ve shown and closed the previous Interstitial Ad. Once the interstitialDidClose function is fired, you will be able to load a new Interstitial ad.
Instance ID
Once you save the defined instances for the ironSource network, we will generate an Instance ID for you. You can retrieve this ID from the instance table within the Ad Units & Placements page:
Step 3. Check Ad Availability
After you call the loadInterstitial in Step 3, you will be notified when the ad is loaded through the delegate with the method interstitialDidLoad.
//Invoked when Interstitial Ad is ready to be shown after the load function was called.
- (void)interstitialDidLoad:(NSString *)instanceId {
}
Alternatively, you can request the ad availability directly by calling the following function and it will return a true or false boolean:
[IronSource hasISDemandOnlyInterstitial:YOUR_INSTANCE_ID];
Step 4. Show Interstitial Ad
Once you receive the interstitialDidLoad callback, you are ready to show an Interstitial Ad to your users.
Invoke the following method to serve an Interstitial ad to your users:
[IronSource showISDemandOnlyInterstitial:YOUR_VIEWCONTROLLER instanceId:YOUR_INSTANCE_ID];
Done!
You can now deliver ironSource Interstitial Ads!
Integrate Banners
ironSource banners will be available as part of ironSource iOS SDK 7.2.5+. To enable the banner ad unit within your account, please contact your account manager. ironSource banner ads are rectangular, system-initiated ads that can be either static or animated that are served in a designated area around your live app content. Unlock and leverage multiple banner instances of the ironSource network to optimize your ad delivery! Available Sizes ironSource banners are available from ironSource iOS SDK 7.2.5+, and support the following sizes: Under SETUP, navigate to the Ad Units & Placements page. Select the app you want to integrate with ironSource banners and click on the banner tab: Once you save the defined instances for the ironSource network, we will generate an Instance ID for you. Follow this guide for instructions on how to set up instances. The ironSource SDK fires several delegate methods to inform you of Banner activity. To receive these events, register to the banner delegate:
ISBannerSize
Description
Dimensions in points (WxH)
ISBannerSize_BANNER
Standard Banner
320 x 50
ISBannerSize_LARGE
Large Banner
320 x 90
ISBannerSize_RECTANGLE
Medium Rectangular (MREC)
300 x 250
Step 1. Create banner ads in the ironSource platform
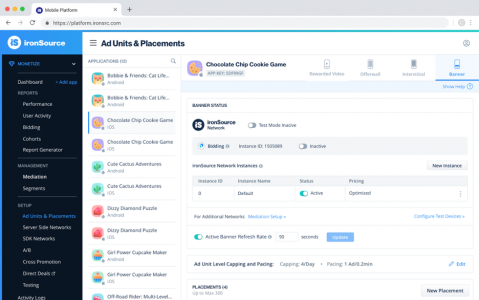
You can retrieve this ID from the instance table.Step 2. Implement the Delegate
(void)setISDemandOnlyBannerDelegate:(id<ISDemandOnlyBannerDelegate>)delegate forInstanceId:(NSString *)instanceId;
The SDK will notify your delegate methods of all possible events listed below:
#pragma mark - ISDemandOnlyBannerDelegate
/**
 Called after a banner ad has been successfully loaded
 @param bannerView The view that contains the ad.
 @param instanceId The demand only instance id to be used to display the banner.
 */
- (void)bannerDidLoad{
}
/**
 Called after a banner has attempted to load an ad but failed.
 @param error The reason for the error
 @param instanceId The demand only instance id that fail to load.
 */
- (void)bannerDidFailToLoadWithError:(NSError *)error {
}
/**
 Called when a banner was shown
 @param instanceId The demand only instance id which did show.
 */
- (void)bannerDidShow {
}
/**
 Called after a banner has been clicked.
 @param instanceId The demand only instance id which clicked.
 */
- (void)didClickBanner{
}
/**
 Called when a user would be taken out of the application context.
 @param instanceId The demand only instance id that taken out of the application.
 */
- (void)bannerWillLeaveApplication{
}
Step 3. Load Banner Ad
To load a banner ad, call the following method:
[IronSource loadISDemandOnlyBannerWithInstanceId:@"InstanceId" viewController:self size:size];Step 4. Destroy the Banner Ad
To destroy a banner, call the following method:
[IronSource destroyISDemandOnlyBannerWithInstanceId:@"InstanceId"];A destroyed banner can no longer be loaded. If you want to serve it again, you must initiate it again.
Example: Create and load a banner ad
Here’s an example that initiates and loads a banner:
#import "ViewController.h"
#import <IronSource/IronSource.h>

@interface ViewController () <ISBannerDelegate>

@property (nonatomic, strong) ISDemandOnlyBannerView      *bannerView;
@end

@implementation ViewController

- (void)viewDidLoad {
    [super viewDidLoad];

 [IronSource setISDemandOnlyBannerDelegate:delegate forInstanceId::@"InstanceId"];
 [IronSource initISDemandOnly:@"YOUR_APP_KEY" adUnits:@[ IS_BANNER ]];
    [[NSNotificationCenter defaultCenter] addObserver:self
                                             selector:@selector(orientationChanged:)
                                                 name:@"UIDeviceOrientationDidChangeNotification"
                                               object:nil];


[IronSource loadISDemandOnlyBannerWithInstanceId:@"InstanceID" viewController:self size:ISBannerSize_BANNER]; /// make sure it's correct
}

#pragma mark - Orientation delegate
- (void)orientationChanged:(NSNotification *)notification {
    dispatch_async(dispatch_get_main_queue(), ^{
        if (self.bannerView) {
            CGFloat y = self.view.frame.size.height - (self.bannerView.frame.size.height / 2);
            if (@available(ios 11.0, *)) {
                y -= self.view.safeAreaInsets.bottom;
            }
            self.bannerView.center = CGPointMake(self.view.frame.size.width / 2, y);
        }
    });
}

#pragma mark - Banner Delegate Functions
- (void)bannerDidLoad:(ISBannerView *)bannerView {
  self.bannerView = bannerView;
        if (@available(iOS 11.0, *)) {
            [self.bannerView setCenter:CGPointMake(self.view.center.x,self.view.frame.size.height - (self.bannerView.frame.size.height/2.0) - self.view.safeAreaInsets.bottom)]; // safeAreaInsets is available from iOS 11.0
        } else {
            [self.bannerView setCenter:CGPointMake(self.view.center.x,self.view.frame.size.height - (self.bannerView.frame.size.height/2.0))];
        }
        [self.view addSubview:self.bannerView];
}

- (void)bannerDidFailToLoadWithError:(NSError *)error {
}

- (void)didClickBanner {
}

- (void)bannerWillLeaveApplication {
}

@end
Done!
You can now deliver ironSource Banner Ads!