AdColony Mediation Integration Guide for SDK 6.4 and Below
This guide will instruct you step-by-step on how to set AdColony live as an Ad Network on the ironSource Mediation platform. The integration process is completed in a few simple steps:
- Create an AdColony Account
- Create an Application and Ad Zone in AdColony
- Activate AdColony in Your ironSource Network Setup Module
- Add the AdColony Adapter to Your Build
Before You Start
Make sure you have correctly integrated ironSource’s Rewarded Video or Interstitial into your application.
Step 1. Create an AdColony Account
- Create an account with AdColony. You can do so here.
- Once your account has been verified, you can log in to their partner login here.
Step 2. Create an Application and Ad Zone in AdColony
To gain access to AdColony’s inventory within ironSource’s Mediation platform, you must first add your app and set up Ad Zones in your AdColony account.
- Add Your App
- Log into your AdColony account and select ‘Setup New App’:

- Define the settings of your app:
- Platform – iOS or Android
- App URL – Add the AppStore or Google Play URL of your application. If your app is not live yet, you can also enter a temporary name manually.
- COPPA – Select if your app is targeted to users under the age of 13 for COPPA compliancy.
- Ad Settings – You can customize which Ad Categories you want to utilize.Once you’ve entered all your information, select ‘Create’ to finish.
 Note: Note: You will need a unique AdColony application per platform (iOS + Android), just the same as in your ironSource account.
- Log into your AdColony account and select ‘Setup New App’:
- Create an Ad Zone
Once your application has been added, you can create an Ad Zone. In AdColony’s system Ad Zones are Placements to which AdColony delivers ads. This will be the placement in your app where you have configured the ironSource Rewarded Video or Interstitial to trigger.- Select ‘Setup New Ad Zone’

- Create the Ad Zone settings:
- Rewarded Video:
Zone is active? ‘Yes’
Zone Type: ‘Value Exchange/V4VC’
Client Side Only: ‘Yes‘
 When finished, hit ‘Create’.

- Interstitial:
Zone is active? ‘Yes’
Zone Type: ‘Preroll/ Interstitial’
House Ads: ‘None’
Development: ‘No’
 When finished, hit ‘Create’.
- Rewarded Video:
- Select ‘Setup New Ad Zone’
Step 3. Activate AdColony in Your ironSource Network Setup Module
There are a few pieces parameters from your AdColony account which need to be inserted into your ironSource Network Setup Module in order for AdColony to work correctly in connection with ironSource:
| App ID | This is the unique identifier of your Application in AdColony’s system. |
| Zone ID | This is the unique Zone which AdColony will deliver ads to. |
| Read-Only API Key | This is a unique identifier for your AdColony account, which allows the ironSource Mediation Platform to import performance data from your AdColony account to use in reporting & optimization. |
Once you obtain this information, you must configure AdColony’s Parameters in your ironSource Account. By adding the above information correctly, you will be able to take full advantage of AdColony’s ad inventory and reporting data on the ironSource Mediation platform.
- App ID
Navigate back to the ‘Apps‘ tab and you will locate the ‘AdColony App ID‘.

- Zone ID
Navigate to ‘Monetization’ ➣ Select the ‘App’ you created ➣ Then select the ‘Zone‘ you created and you will be directed to the below page, where you will find the ‘Zone ID‘.

- Read-Only API Key
Select the Drop-down menu on the top right of their dashboard, and you will find the ‘Account Settings’ link.
 On the settings page you will find the ‘Read-Only API Key’.

Configure AdColony’s Parameters into ironSource Account
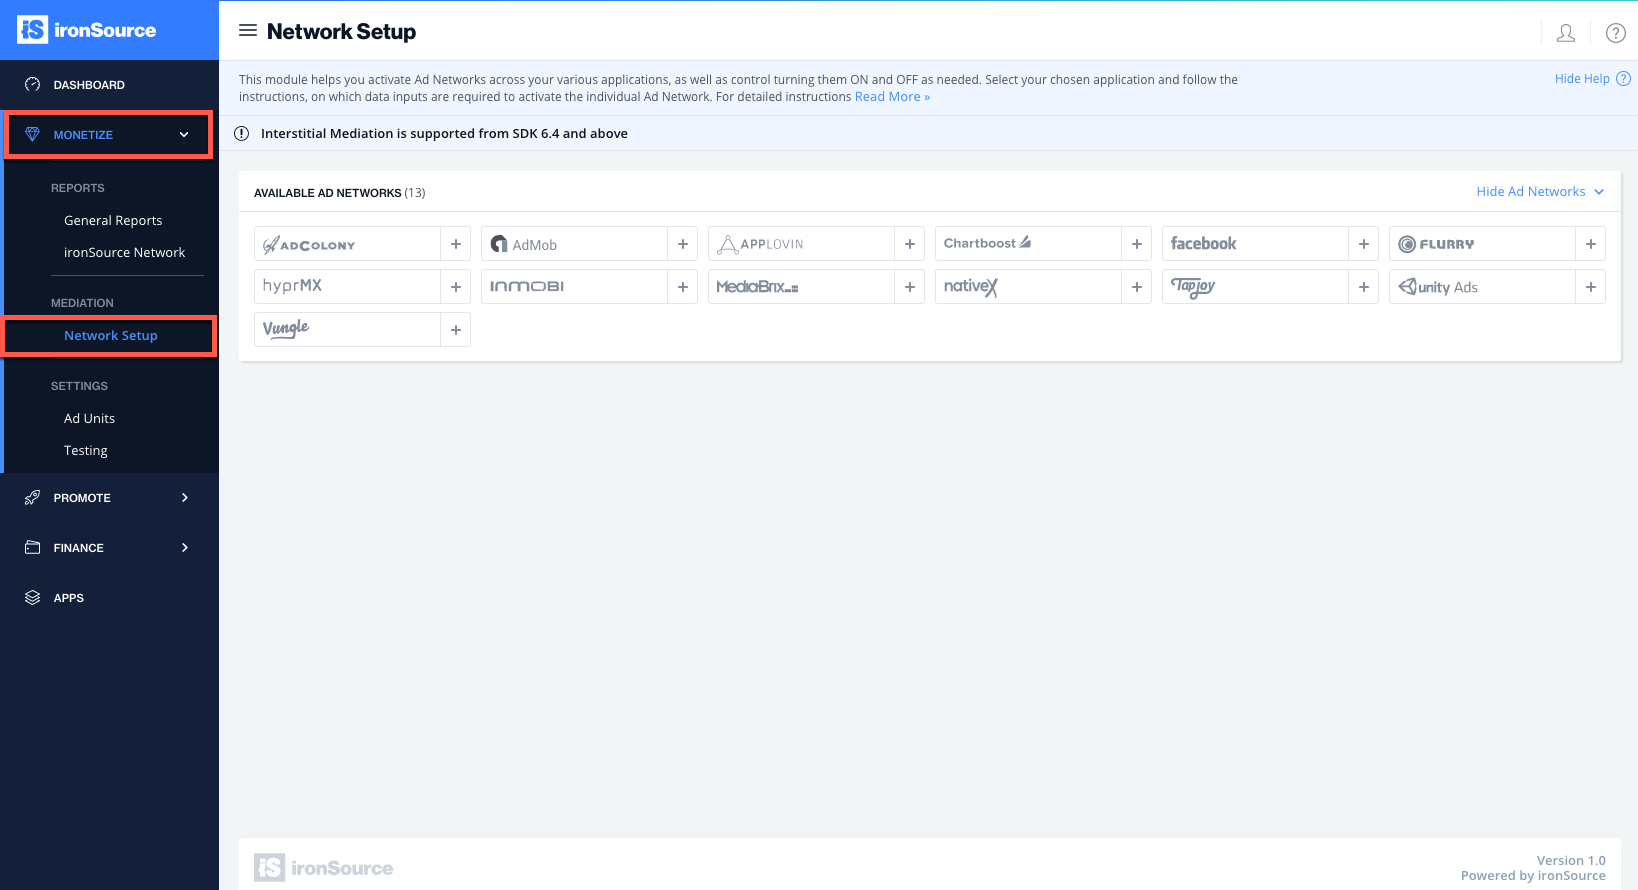
- Once you have all of these parameters, log in to your ironSource account and go to ‘Monetize‘ ➣ ‘Mediation‘ ➣ ‘SDK Networks‘.
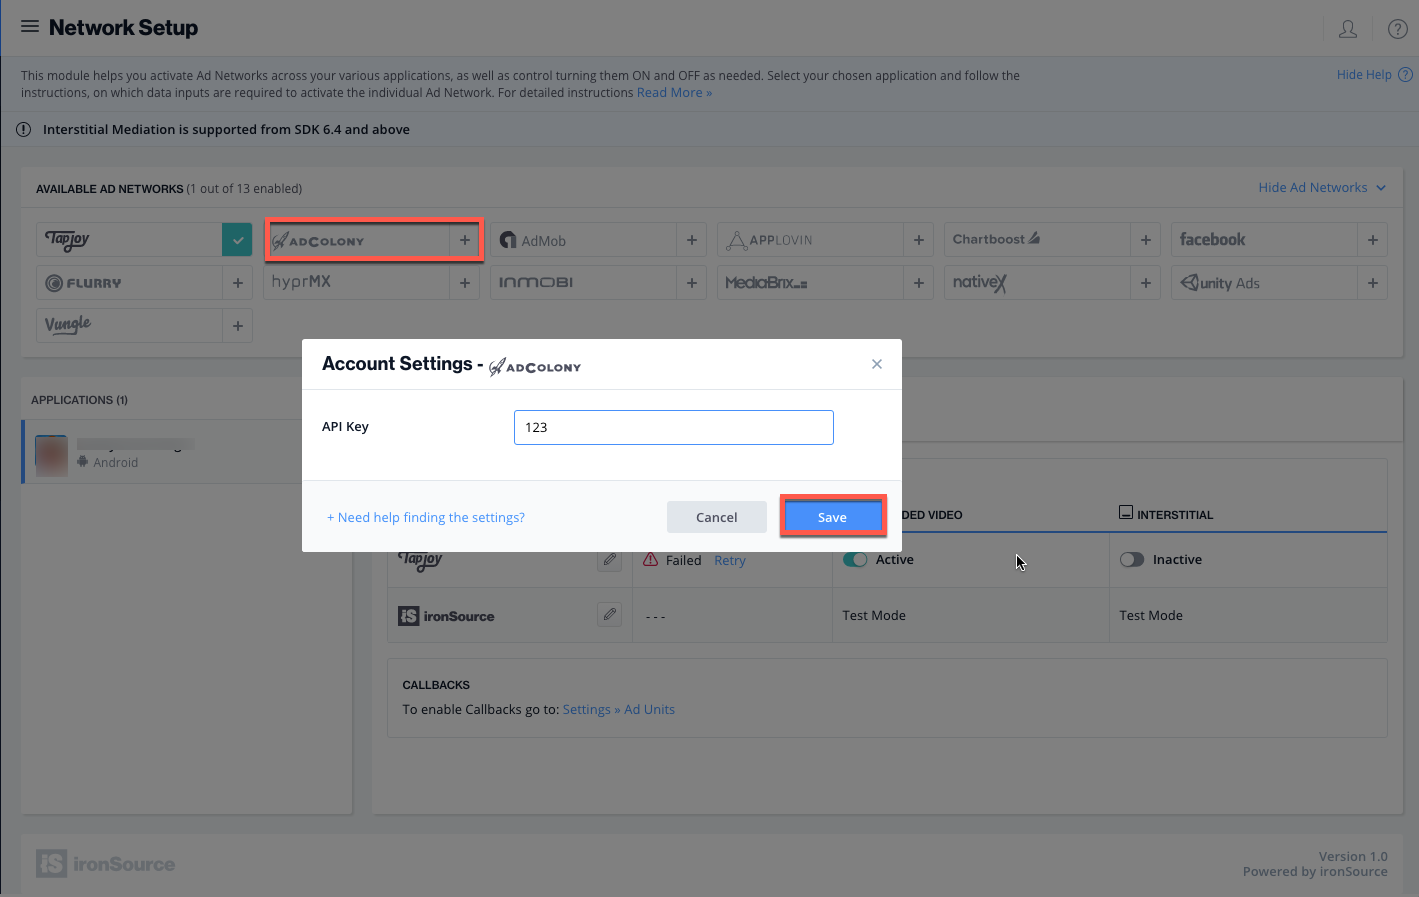
- Select AdColony from the list of Available Ad Networks and enter the AdColony ‘API Key‘. Click ‘Save‘.
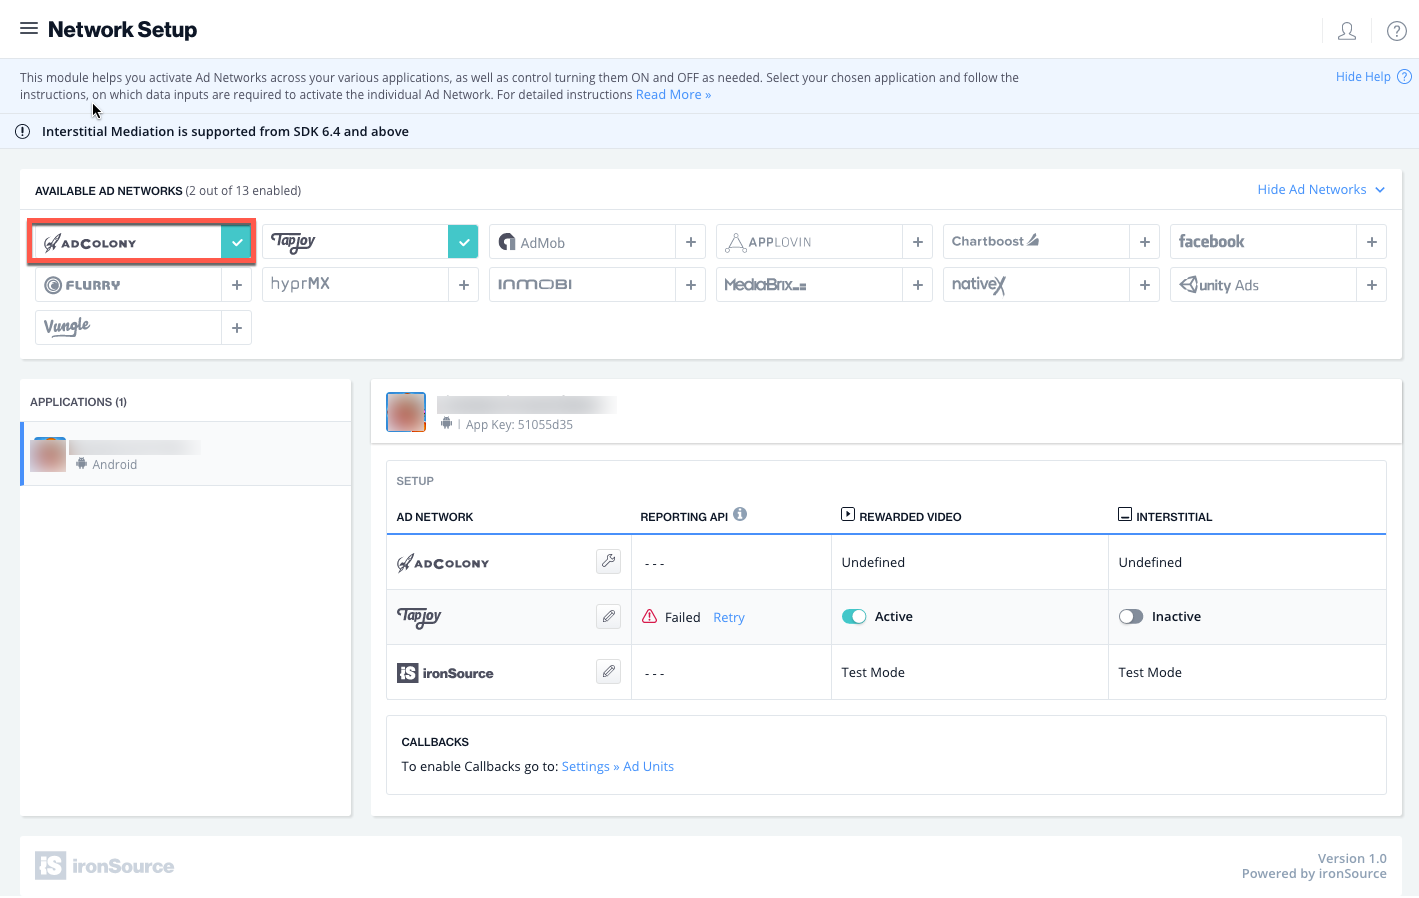
- AdColony will then be enabled in the Available Ad Networks table.
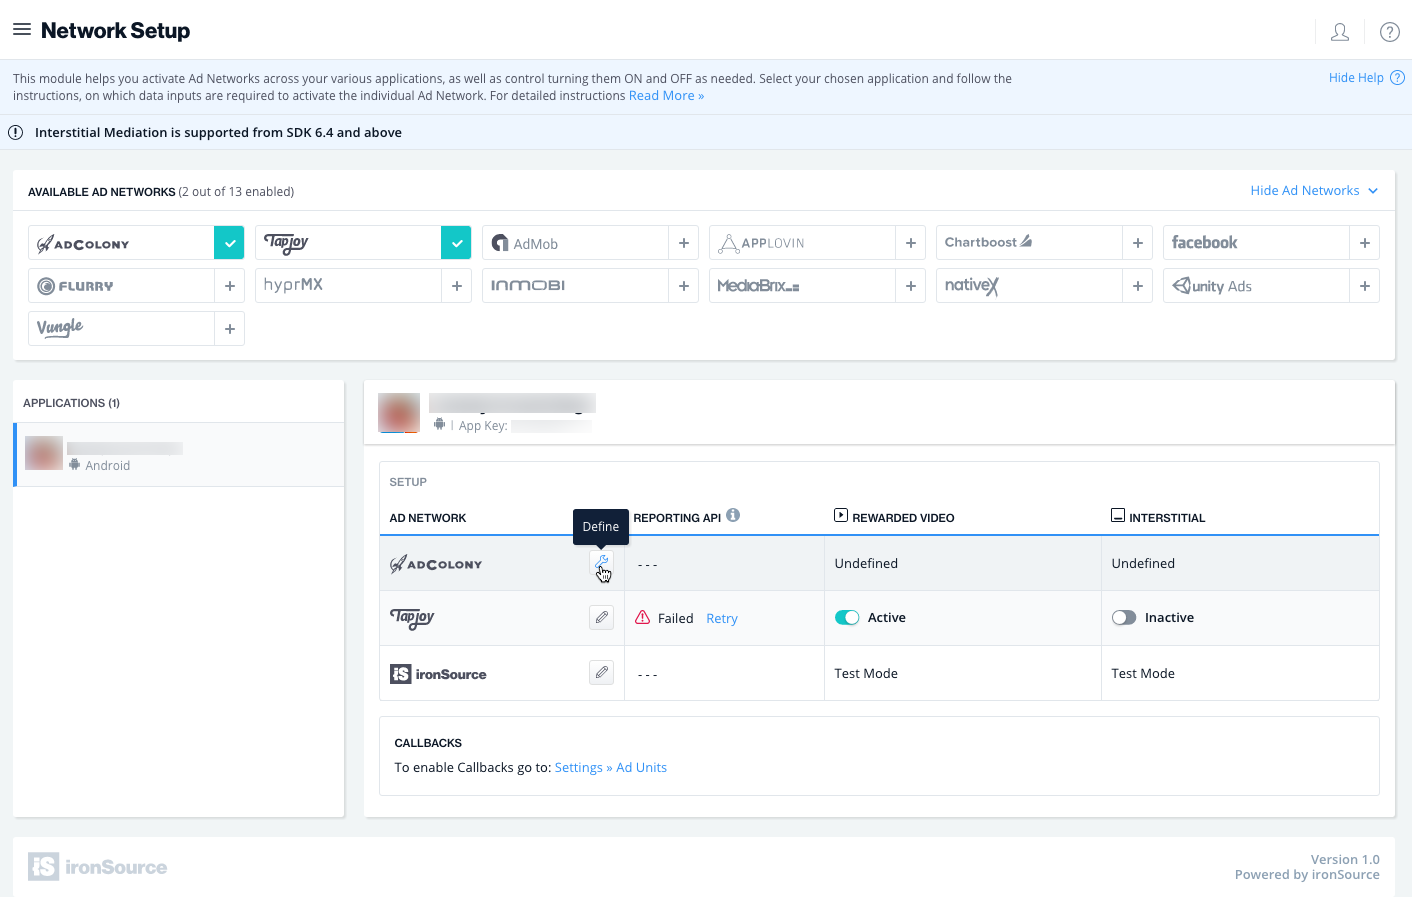
- Make sure to define the app on which you’d like to run ironSource’s Interstitial Mediation with AdColony. Go to the AdColony row on the Setup list of Ad Networks and click on the ‘Define‘ icon.
- Insert the ‘App ID‘ and the ‘Zone ID‘ for Rewarded Video and/or Interstitial in the relevant fields.
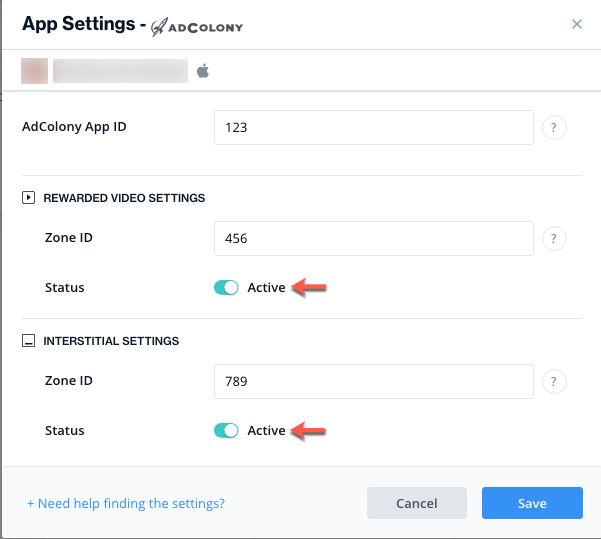
- Set status to Active and click ‘Save’. You will then see AdColony as Active for Mediation on your Setup Dashboard.

- New! Verify your integration with the Reporting API; this column will check your integration through the Reporting API and return three possible responses: Verified, Failed and No Response. Double check your integration and the information you entered above; then click ‘Retry‘ until you see ‘Verified’.
Step 4. Add the AdColony Adapter to Your Build
iOS
ironSource supports both Cocoapods and Manual download mechanisms.
Download the AdColony Adapter with Cocoapods
To integrate the AdColony SDK with Cocoapods, enter the following line in your podfile and you’re good to go!
pod 'SupersonicAdColonyAdapter','~>2.1.5'
Download the AdColony Adapter Manually
- Download the AdColony Adapter:
Add the AdColony Adapter to your build. You can find the latest AdColony Adapter here.
Important! The AdColony Adapter also contains the AdColony SDK. You DON’T need to add the AdColony SDK directly. - Add the AdColony frameworks to your Project:
After you download the Adapter, drop the Adapter framework into your Xcode Project, i.e. drop SUAdColonyAdapter.framework into your Xcode project. - Open Target ➣ Build Settings ➣ Architectures and confirm that your Xcode Project uses Base SDK version 6.0 or greater and that it does not use armv6 architecture.
- Adding Required Frameworks:
Go to Targets ➣ Build Phases ➣ Link Binary With Libraries.
Click ‘+’ to add the following frameworks:Social.framework EventKit.framework MessageUI.framework AudioToolbox.framework JavaScriptCore.framework (Optional) libz.1.2.5.tbd WatchConnectivity.framework (Optional)
Step 5. Configure Additional Settings
- Add a separate linker flag to Target ➣ Build Settings ➣ Linking ➣ Other Linker Flags:
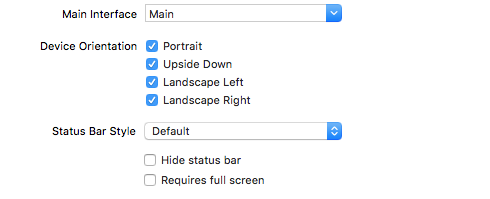
–fobjC-arc - Configure Supported Orientations
In order for your app to work in conjunction with the AdColony SDK, your app must support all orientations globally. To do this, select all possible orientations under the General tab of your Xcode target:
- Configure App Transport Security (ATS) Settings & URL Schemes
- Add the following key to your plists:
<key>NSAppTransportSecurity</key> <dict> <key> NSAllowsLocalNetworking</key> <true/> </dict> - Next, add the following entry to your app’s plist for URL scheme support:
<key>LSApplicationQueriesSchemes</key>
    <array>
        <string>fb</string>
        <string>instagram</string>
        <string>tumblr</string>
        <string>twitter</string>
    </array>
</key>
- Add the following key to your plists:
- Configure Privacy Controls (Only for iOS10)
If your app is compatible with iOS 10, make sure to configure the below Privacy Controls:<key>NSCalendarsUsageDescription</key> <string>Adding events</string> <key>NSPhotoLibraryUsageDescription</key> <string>Taking selfies</string> <key>NSCameraUsageDescription</key> <string>Taking selfies</string> <key>NSMotionUsageDescription </key> <string>Interactive ad controls</string>
Read more about these configurations in here.
Verify Your Ad-Network Integration
The ironSource SDK provides an easy way to verify that your mediation integration was completed successfully. To verify your ironSource and any additional Ad Networks’ integration, follow this document.
Done!
You are now all set to deliver AdColony Ads within your application!
What’s Next?
To add additional Ad networks, follow the integration guides on our Supported Ad Networks list.